One of the most important pages in any Woo-commerce store is the checkout page. In the world today, there are many online stores. Therefore, you need to customize your checkout page to be ahead of your competitors.
Also Read: How to remove product-category slug in WooCommerce?
Do you want to create conditional logic on the WooCommerce check-out page? In this article, you will learn how to add Conditional Checkout Fields in WooCommerce.
WooCommerce Conditional Checkout Fields
Let’s assume you have a product (Ex. Handmade Sweater, Shirt) and you want to collect more details like customized fitting size (Ex. Neck, Chest, Waist, Sleeve) at check-out.
One of the best ways of improving the check-out is by adding conditional fields. We can add fields to the checkout using WooCommerce based on almost any conditional matches. These fields allow you to create a conditional logic and show only fields that the customer must completed to speed up the purchasing process on the checkout page.
Steps to Add WooCommerce Conditional Checkout Fields on the Checkout Page
Adding Custom Fields to Checkout
WooCommerce has many useful hooks to apply with our code. We’re going to use woocommerce_before_order_notes for this tutorial that allows us to add our custom fields in the checkout form right above the ‘Order Notes’ box.
Add the following code to the functions.php file under in your current theme or child theme folder:
/**
* Add the field to the checkout
**/
add_action( 'woocommerce_before_order_notes', 'tw_custom_checkout_field' );
function tw_custom_checkout_field( $checkout ) {
//Customized Size Shirt or sweater is in cart so show additional fields
echo '' . __( 'Customized Fitting Size (In centemeter)' ) . '
Do you want to add your fitting size (eg. Neck, Chest, Waist, Sleeve)?
';
woocommerce_form_field( 'fitting_size_checkbox', array(
'type' => 'checkbox',
'class' => array( 'fittingSize-checkbox form-row-wide' ),
'label' => __( 'Yes' ),
), $checkout->get_value( 'fitting_size_checkbox' ) );
woocommerce_form_field( 'fitting_neck_textbox', array(
'type' => 'text',
'required' =>'required',
'class' => array( 'fitting-size-text form-row-first' ),
'label' => __( 'Enter Neck Size in cm' ),
), $checkout->get_value( 'fitting_neck_textbox' ) );
woocommerce_form_field( 'fitting_chest_textbox', array(
'type' => 'text',
'required' =>'required',
'class' => array( 'fitting-size-text form-row-last' ),
'label' => __( 'Enter Chest Size in cm' ),
), $checkout->get_value( 'fitting_chest_textbox' ) );
woocommerce_form_field( 'fitting_waist_textbox', array(
'type' => 'text',
'required' =>'required',
'class' => array( 'fitting-size-text form-row-first' ),
'label' => __( 'Enter Waist Size in cm' ),
), $checkout->get_value( 'fitting_waist_textbox' ) );
woocommerce_form_field( 'fitting_sleeve_textbox', array(
'type' => 'text',
'required' =>'required',
'class' => array( 'fitting-size-text form-row-last' ),
'label' => __( 'Enter Sleeve Size in cm' ),
), $checkout->get_value( 'fitting_sleeve_textbox' ) );
echo '';
}
Hide the Fitting Size Text Field with CSS until they have chosen the option. Add below CSS to your theme’s stylesheet:
.fitting-size-text{display:none;}
Slide Toggle the Field to hide/show Based on the Customer’s Choice
Now, if the user selects the “Yes” checkbox we want to slide the Customized Fitting Size Text Box field down to display. If they uncheck the field we will slide it up to hide. Just copy and paste below simple jQuery to do this:
 jQuery(document).ready(function( $ ){
  $('.fittingSize-checkbox input[type="checkbox"]').on('click', function () {
        $('.fitting-size-text').slideToggle();
});
  });
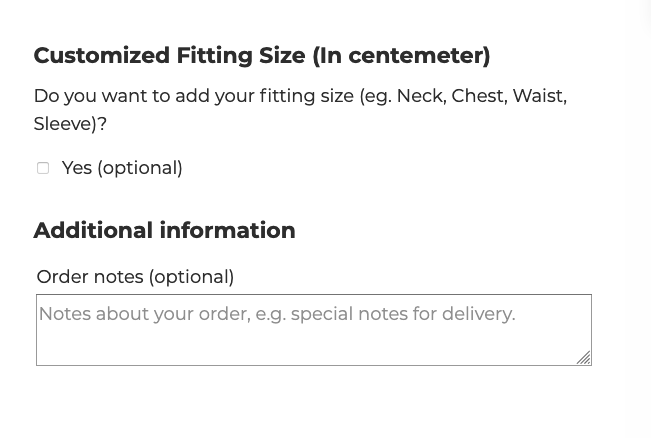
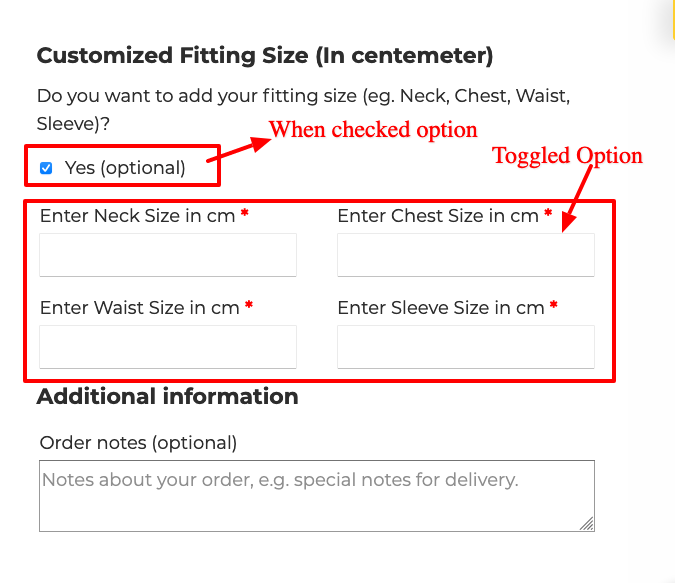
Now add any product in the cart and go to checkout page. You should see the fields added right above the ‘Order Notes’ box.
Refer the following image
Not Checked option and Not Toggled slide:
Checked option and Toggled slide:
Save the New Checkout Fields After Successful Order
Now We are going to use another WooCommerce hook called woocommerce_checkout_update_order_meta, this hook will save custom fields to the order meta.
Copy and paste the code below to the function.php file:
/**
 * Update the order meta with field value
 **/
add_action( 'woocommerce_checkout_update_order_meta', 'tw_custom_checkout_field_update_order_meta' );

function tw_custom_checkout_field_update_order_meta( $order_id ) {

	//check if $_POST has our custom fields
	if ( $_POST['fitting_size_checkbox'] ) {
		//It does: update post meta for this order
		update_post_meta( $order_id, 'Customized Fitting Size', esc_attr( $_POST['fitting_size_checkbox'] ) );
	}
	if ( $_POST['fitting_neck_textbox'] ) {
		update_post_meta( $order_id, 'Neck Size in cm', esc_attr( $_POST['fitting_neck_textbox'] ) );
	}

	if ( $_POST['fitting_chest_textbox'] ) {
		update_post_meta( $order_id, 'Chest Size in cm', esc_attr( $_POST['fitting_chest_textbox'] ) );
	}

	if ( $_POST['fitting_waist_textbox'] ) {
		update_post_meta( $order_id, 'Waist Size in cm', esc_attr( $_POST['fitting_waist_textbox'] ) );
	}

	if ( $_POST['fitting_sleeve_textbox'] ) {
		update_post_meta( $order_id, 'Sleeve Size in cm', esc_attr( $_POST['fitting_sleeve_textbox'] ) );
	}
}
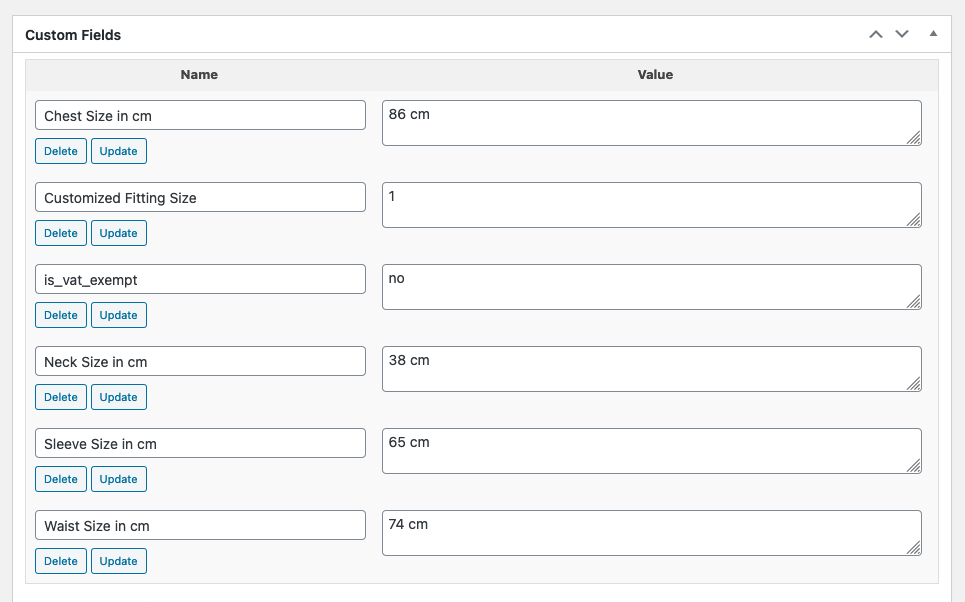
Now test an order and you will get our custom field data in the order’s post meta. Please refer below image
Add the Custom Field Data to Order Emails
Mostly the shop owner get notification of orders via email. Now, what we want to do is send our custom field data along with that email so they can fulfill the order accordingly.
To send our custom fields data along with the email, We are going to be using a filter called woocommerce_email_order_meta_keys.
Copy and paste the code below to the function.php file
/**
 * Add the field to order emails
 **/
add_filter( 'woocommerce_email_order_meta_keys', 'tw_checkout_field_order_meta_keys' );

function tw_checkout_field_order_meta_keys( $keys ) {
		$keys[] = 'Customized Fitting Size';
		$keys[] = 'Neck Size in cm';
		$keys[] = 'Chest Size in cm';
		$keys[] = 'Waist Size in cm';
		$keys[] = 'Sleeve Size in cm';

	return $keys;
}
Now test an order and you will get our custom field data in the order’s notification email.
Please refer below image
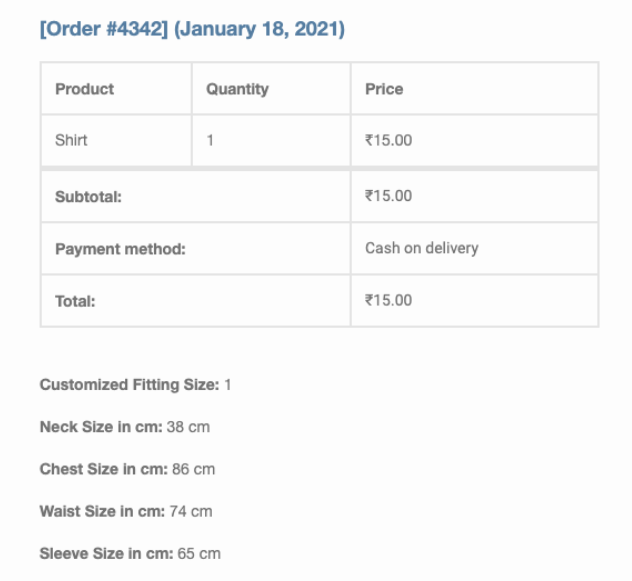
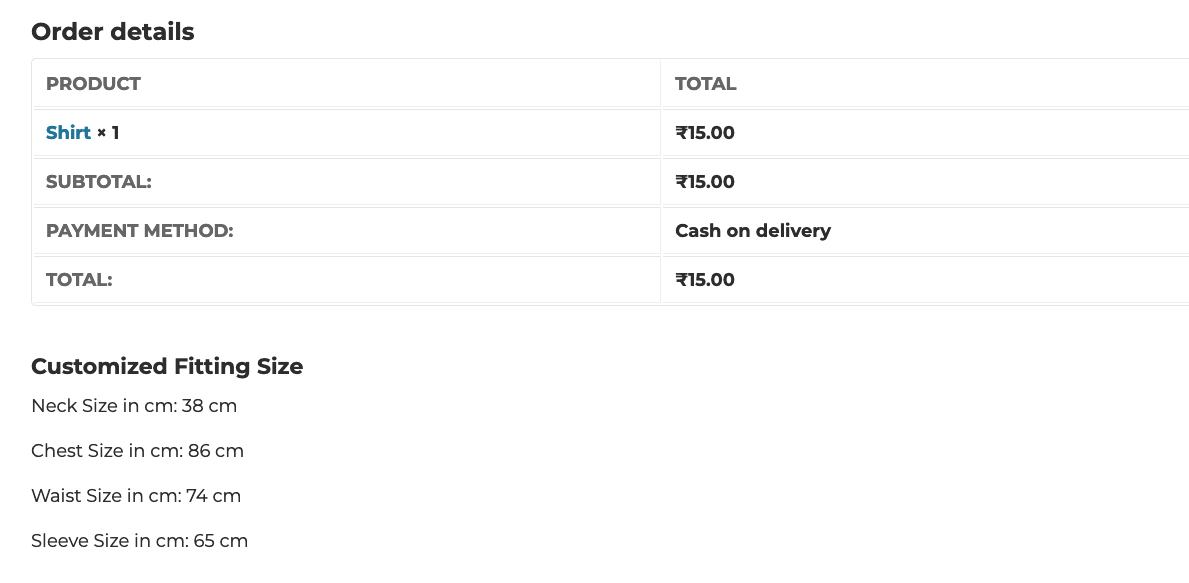
Displaying the custom field on WooCommerce Thank you page
To display our custom fields data on WooCommerce thank you page, We are going to be using a filter called woocommerce_order_details_after_order_table.
Copy and paste the code below to the function.php file:
/**
* * Displaying the custom field on WooCommerce Thank you page
* */
add_filter( 'woocommerce_order_details_after_order_table', 'tw_view_order_and_thankyou_page');
function tw_view_order_and_thankyou_page( $order ){
if( version_compare( get_option( 'woocommerce_version' ), '3.0.0', ">=" ) ) {
$order_id = $order->get_id();
} else {
$order_id = $order->id;
}
if(get_post_meta( $order_id, 'Customized Fitting Size', true )=='1'){
echo "Customized Fitting Size
";
echo "Neck Size in cm: ".get_post_meta( $order_id, 'Neck Size in cm', true )."
";
echo "Chest Size in cm: ".get_post_meta( $order_id, 'Chest Size in cm', true )."
";
echo "Waist Size in cm: ".get_post_meta( $order_id, 'Waist Size in cm', true )."
";
echo "Sleeve Size in cm: ".get_post_meta( $order_id, 'Sleeve Size in cm', true )."
";
}
}
Now test an order and you will get our custom field data in the order’s notification email. Please refer below image.
Also Read: Add custom fields to WooCommerce registration form without plugin
Conclusion
Well, This tutorial provide you complete steps to how to add conditional fields on the WooCommerce checkout page. I hope you found this tutorial helpful for your project. Keep learning!. If you face any problem – I am here to solve your problems.
Are you want to get implementation help, or modify or extend the functionality of this script? Submit a paid service request


Pradeep Maurya is the Professional Web Developer & Designer and the Founder of “Tutorials website”. He lives in Delhi and loves to be a self-dependent person. As an owner, he is trying his best to improve this platform day by day. His passion, dedication and quick decision making ability to stand apart from others. He’s an avid blogger and writes on the publications like Dzone, e27.co