In this article, I’ll show you how to install MySQL server on AWS Amazon Linux EC2 machine, which will hopefully help you get started with your project deployment to AWS.
So, since Amazon Linux 2 is a popular webserver operating system, we need to know how to install MySQL database server on Amazon Linux 2. At first, you create an EC2 instance in AWS.
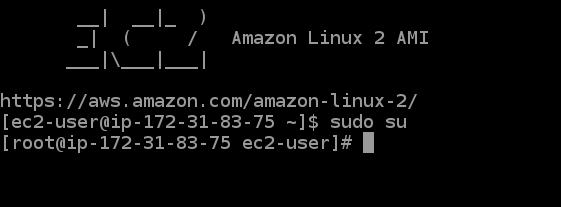
I am assuming that everyone already created EC2 instance on AWS. Now you have to connect your instance via Putty or Terminal.
If you don’t know how to create instance and connect it using Terminal then follow the below video.
Please don’t follow the complete video because this video is related to nodejs installation. You just need to learn about how to create instance and connect it using terminal.
After connection using terminal, you need to update your privileges to root user (sudo su) before installing the MySql.
Install MySQL server on AWS Amazon Linux EC2
Now, I’ll show you how to install MySQL on your Amazon Linux 2 EC2 instance using the commands below. Let me go over each command one by one so you understand what you’re doing and, if you get stuck, you can look up the error message to find out what’s wrong.
sudo yum update -y So sudo yum update -y basically updates all packages to the latest version from an Amazon-managed repository list for Amazon Linux 2. So now that we’ve updated our package list, the next command will be to install the MySQL server on this machine.
sudo yum install -y mariadb-serverAfter this, MySQL install command will ask you a few questions, After you’ve provided those answers, please run this command to start the MySQL server and enable it to run at boot time. If your server reboots, you must manually run the command to restart the MySQL server.
Start the mysql server
sudo systemctl start mariadb Enable mysql to start when system reboots
sudo systemctl enable mariadb Now, we need to secure the installation by running below command.
sudo mysql_secure_installationIt will ask you a few questions, whose answers are given in my video tutorial, but I am writing it here as well.
Question: Enter current password for root ( enter for none ) :
Answer: Just press enter because there is not root password available as we just did the setup now.
Question: Set Root password? [Y/n]
Answer: Type here ‘y’ and then press enter. Then it will ask you for new passwords. Please provide a strong password and press enter.
Question: Remove anonymous user? [Y/n]
Answer: type ‘y’ and press enter
Question: Disallow root login remotely? [Y/n]
Answer: type ‘y’ and press enter.
Question: Remove test database and access to it? [Y/n]
Answer: Type ‘y’ and press enter. This will remove the test database and its access to users. If you want to keep the test database then type ‘n’ and press enter. The choice is yours, but I suggest to delete the test database.
Question: Reload privilege tables now? [Y/n]
Answer: Type ‘y’ and press enter. This is reload the privilege tables.
If you have answered the last question, then it’s done and you have secured the MySQL installation.
After that, you can connect to your mysql server by running this command.
mysql -uroot -p; if you run this command then it will ask you for the password. Please enter the new password which you set in the MySQL secure installation process.
If you have done all the steps correctly then you will probably see this message “Welcome to the MariaDB monitor”
Also Read: How to Install PHP 7.4 or 7.3 or 7.2 on AWS EC2 Instance
Conclusion:
Now we have installed MySql MySQL server on AWS Amazon Linux EC2. Hope I was able to help someone out. If you have any questions feel free to ask anything on the comment section. Cheers!!.
Are you want to get implementation help, or modify or extend the functionality of this script? Submit a paid service request

Pradeep Maurya is the Professional Web Developer & Designer and the Founder of “Tutorials website”. He lives in Delhi and loves to be a self-dependent person. As an owner, he is trying his best to improve this platform day by day. His passion, dedication and quick decision making ability to stand apart from others. He’s an avid blogger and writes on the publications like Dzone, e27.co