There is a clear shift from offline to online. Many factors have triggered the digital and e-commerce turning point across regions. But what are the main reasons many businesses established internet shopping in their sales process? Although there are many, some of them include:
Cost reduction by saving hefty amounts on rent, repairs, store design, inventory, etc.
Easier to maintain an e-commerce store compared to a physical store.
Allows business owners to purchase a website address at an affordable price compared to opening a physical store.
Besides these factors, what else do you think are the major elements that drove life online? In the digital era, building an online store makes it easy to grow your brand, acquire loyal customers, get creative with your marketing, and continue improvement by gaining new insights and customer feedback.
Having your website is a dynamic part of your eCommerce strategy. Woocommerce is one of the best plugins that enables you to build an eCommerce store using WordPress. It is the best and one of the most cost-efficient tools that facilitates selling your products or service on your website.
Are you finding it difficult to create a payment gateway plugin for WooCommerce? We have got you covered! This article will help you build a payment gateway for your Woocommerce store within minutes. But before that, let’s find out how to add a payment gateway to your WordPress site.
How to Add a Payment Gateway in WordPress?
Listed below are the series of steps you should follow to add a payment gateway to your WordPress site:
Purchase or download the payment gateway WordPress plugin meeting your requirements
Log in as a WordPress admin and click ‘Plugin’ on the sidebar menu. Doing this, you need to choose the ‘Add New’ option.
To upload the plugin zip file, click on ‘Upload’ and ‘Choose File.’
Then to begin the installation process, press ‘Ok’ and ‘Install Now.’
Activate your new plugin once it’s installed.
In Woocommerce, go to ‘Settings’ and tap ‘Payment Methods.’
Considering your website needs, configure your Woocommerce payment gateway.
Now, accessing the Woocommerce website has some in-built payment gateways. Let’s dive in to learn about them!
Default Payment Gateway in Woocommerce
If you see, the payment gateways available in Woocommerce by default are:
1. Direct Bank Transfers (BACS)
The payments need not be made online for the Direct Bank Transfers payment gateway.
2. Check Payment
This payment gateway does not require any payment to be made online. The payments are kept on hold until they are settled outside Woocommerce.
3. Cash on Delivery
In this payment mode, the order status is set to processing until the cash is paid on delivery.
These are the default payment options to add to your wooCommerce store. However, if you want to opt for other payment gateway options, you have come to the right guide. Check out how you can create your custom payment gateway plugin for your wooCommerce site.
Steps to Create a Payment Gateway Plugin for Woocommerce
You can add your customizable gateway to wooCommerce. Want to know how? Once you can set your custom gateway, you can set the title, description, instructions, icon, and email instructions, send additional emails, accept virtual orders, input fields to collect data on checkout, and do much more.
Let’s begin with our tutorial to help you create a payment gateway plugin for Woocommerce:
1. Structure of the Payment Plugin
We begin with creating a plugin. If you are not aware, customer payment methods are plugins that we need to create.
Do you think that creating plugins for Woocommerce is hard? Once you go through these steps, you will feel like it is the easiest thing to do. To build one, you need to create a file and add lines of code inside it.
If you see the following code, you will see payment-gateway.php file in the Plugins folder. Suppose your plugin comprises more than 1 file, move it to a folder with a similar name. For instance- tutorialswebsite-custom-payment-gateway/payment-gateway.php.
Open/Edit payment-gateway.php file and copy/paste the below code
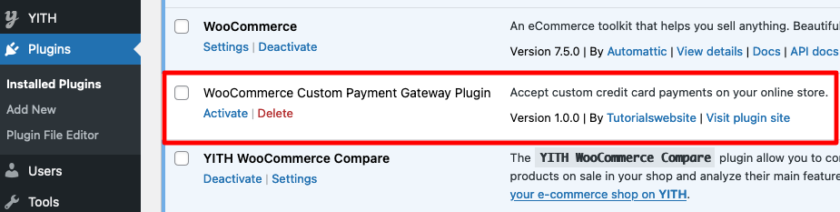
Output Screenshot:


Doing it will enable you to see the plugin in your admin area. Can you see the plugin? Yes? Great! You are all set to activate it now!


2. Build a Custom PHP Class


Payment gateways are PHP classes. You need to create a custom PHP class to extend the Woocommerce payment gateway plugin. Are you finding it challenging? We have got your back!


All you need to do is copy and paste the codes into your main plugin file payment-gateway.php as described below:


Register our custom PHP class as a custom Woocommerce Payment Gateway


// Define your plugin class name here
add_filter( 'woocommerce_payment_gateways', 'twc_add_gateway_class' );
function twc_add_gateway_class( $gateways ) {
	$gateways[] = 'WC_tutorials_website_Gateway'; // Custom Payment Gateway class name
	return $gateways;
}


Check WooCommerce plugin is activated or not


/*
 * trigger plugins_loaded action hook to check woocommerce plugin activated or not and extend WooCommerce WC_Payment_Gateway class.
 */
add_action( 'plugins_loaded', 'init_custom_payment_gateway_function' );

function init_custom_payment_gateway_function() {

    // check woocommerce is installed and activated

    if ( is_admin() && current_user_can( 'activate_plugins') && !is_plugin_active( 'woocommerce/woocommerce.php') ) {

        // Show dismissible error notice
        add_action( 'admin_notices', 'my_plugin_woocommerce_check_notice' );

        // Deactivate this plugin
        deactivate_plugins( plugin_basename( __FILE__) );
        if ( isset( $_GET['activate'] ) ) {
            unset( $_GET['activate'] );
        }
        return;
    }


}

 // Show dismissible error notice if WooCommerce is not present
function my_plugin_woocommerce_check_notice() {
    ?>

        Sorry, WooCommerce plugin sholud be installed and activated.


Extend the WooCommerce WC_Payment_Gateway class.


/*
 * trigger plugins_loaded action hook to check woocommerce plugin activated or not and extend WooCommerce WC_Payment_Gateway class.
 */
add_action( 'plugins_loaded', 'init_custom_payment_gateway_function' );

function init_custom_payment_gateway_function() {

    // check woocommerce is installed and activated

    if ( is_admin() && current_user_can( 'activate_plugins') && !is_plugin_active( 'woocommerce/woocommerce.php') ) {

        // Show dismissible error notice
        add_action( 'admin_notices', 'my_plugin_woocommerce_check_notice' );

        // Deactivate this plugin
        deactivate_plugins( plugin_basename( __FILE__) );
        if ( isset( $_GET['activate'] ) ) {
            unset( $_GET['activate'] );
        }
        return;
    }

    // Start custom plugin functionality to process

	class WC_tutorials_website_Gateway extends WC_Payment_Gateway {

 		/**
 		 * Class constructor, more about it in Step 3
 		 */
 		public function __construct() {


 		}

		/**
 		 * Plugin options, we deal with it in Step 3 too
 		 */
 		public function init_form_fields(){


	 	}

		/**
		 * You will need it if you want your custom credit card form, Step 4 is about it
		 */
		public function payment_fields() {


		}

		/*
		 * Custom CSS and JS, in most cases required only when you decided to go with a custom credit card form
		 */
	 	public function payment_scripts() {


	 	}

		/*
 		 * Fields validation, more in Step 5
		 */
		public function validate_fields() {


		}

		/*
		 * We're processing the payments here, everything about it is in Step 5
		 */
		public function process_payment( $order_id ) {


	 	}

		/*
		 * In case you need a webhook, like PayPal IPN etc
		 */
		public function webhook() {


	 	}
 	}
}
 // Show dismissible error notice if WooCommerce is not present
function my_plugin_woocommerce_check_notice() {
    ?>

        Sorry, WooCommerce plugin sholud be installed and activated.


Copying and pasting the code mentioned above 'as it is' in your plugin file will pop a '500 error' notification on your screen. The reason is that the plugin class structure signifies the code illustrated above, where each method should be.


3. Payment Gateway Plugin Options


Custom payment gateway plugin options involve the following steps:


Class Constructor (public function __construct)


public function __construct() {

$this->id = 'tutorialswebsite'; // payment gateway plugin ID
$this->icon = ''; // URL of the icon that will be displayed on checkout page near your gateway name
$this->has_fields = true; // in case you need a custom credit card form
$this->method_title = 'Tutorialswebsite Custom Gateway';
$this->method_description = 'Description of Custom payment gateway'; // will be displayed on the options page

// gateways can support subscriptions, refunds, saved payment methods,
// but in this tutorial we begin with simple payments
$this->supports = array(
		'products'
	);

// Method with all the options fields
$this->init_form_fields();

// Load the settings.
$this->init_settings();

	$this->title = $this->get_option( 'title' );
	$this->description = $this->get_option( 'description' );
	$this->enabled = $this->get_option( 'enabled' );
	$this->testmode = 'yes' === $this->get_option( 'testmode' );
	$this->private_key = $this->testmode ? $this->get_option( 'test_private_key' ) : $this->get_option( 'private_key' );
	$this->publishable_key = $this->testmode ? $this->get_option( 'test_publishable_key' ) : $this->get_option( 'publishable_key' );

// This action hook saves the settings
add_action( 'woocommerce_update_options_payment_gateways_' . $this->id, array( $this, 'process_admin_options' ) );

// We need custom JavaScript to obtain a token
add_action( 'wp_enqueue_scripts', array( $this, 'payment_scripts' ) );

// You can also register a webhook here
add_action( 'woocommerce_api_{webhook name}', array( $this, 'webhook' ) );


}
Define class properties, like gateway ID and name lines 05-15,
Initialize the settings, lines 17-21,
Lines 23-28- Add options to class properties.
Line 31- Save options
Line 34- If required, enqueue custom CSS and Javascript.
The payment gateway webhooks can also be registered in the class constructor on line 37.
Option Fields (public function init_form_fields)
The option fields could be different depending on your payment processor. But in most case, it will be the same like “Enabled/Disabled”, “Title”, “Description” and “Test mode” options
	public function init_form_fields(){

	$this->form_fields = array(
		'enabled' => array(
			'title'       => 'Enable/Disable',
			'label'       => 'Enable Tutorialswebsite Custom Gateway',
			'type'        => 'checkbox',
			'description' => '',
			'default'     => 'no'
		),
		'title' => array(
			'title'       => 'Title',
			'type'        => 'text',
			'description' => 'Enter the title which you want to display during checkout.',
			'default'     => 'Tutorialswebsite Custom Payment',
			'desc_tip'    => true,
		),
		'description' => array(
			'title'       => 'Description',
			'type'        => 'textarea',
			'description' => 'Enter the description which you want to display during checkout.',
			'default'     => 'Pay with your tutorialswebsite custom payment gateway.',
		),
		'testmode' => array(
			'title'       => 'Test mode',
			'label'       => 'Enable Test Mode',
			'type'        => 'checkbox',
			'description' => ' Enable payment gateway in test mode using test API keys.',
			'default'     => 'yes',
			'desc_tip'    => true,
		),
		'test_publishable_key' => array(
			'title'       => 'Test Publishable Key',
			'type'        => 'text'
		),
		'test_private_key' => array(
			'title'       => 'Test Private Key',
			'type'        => 'password',
		),
		'publishable_key' => array(
			'title'       => 'Live Publishable Key',
			'type'        => 'text'
		),
		'private_key' => array(
			'title'       => 'Live Private Key',
			'type'        => 'password'
		)
	);
}
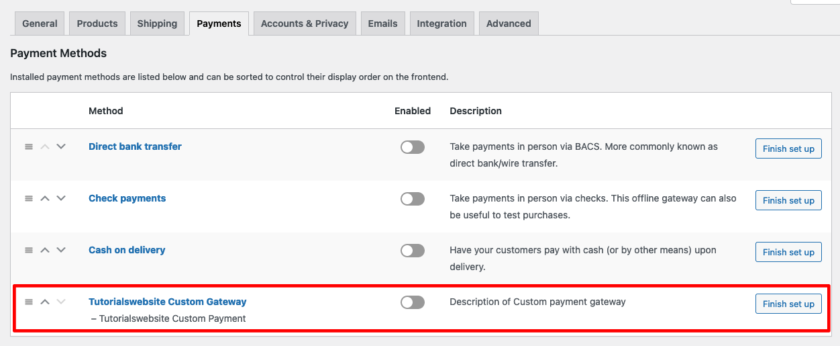
After successfully implementing the above code you can see the below screenshot option, Goto -> Woocommerce ->Settings->Payments
If you have followed everything accurately, your page should appear like this.
Now click on Finish set up button, and you will get the below screenshot option to set up your live and test API Key details, Enable test mode or live gateway.
Fill in the payment options of your custom gateway!
Yooo, you have done 50% tasks in order to create a WooCommerce custom payment gateway.
Are you want to get implementation help, or modify or extend the functionality?
Important points before implementing the code below:
Suppose you want to create a payment gateway on a platform similar to PayPal (a payment gateway website); you can skip step 4 [no need to add payment_fields ( ) & validate_fields( )]. It means you can straightway jump to Step 5.
We assume that you are using a payment processor allowing you to send card data with its own AJAX request. The payment processor you have opted for will give you a token to use in PHP, so do not add name attributes to the card form fields.
Let's check out how it works step by step:
1. Your customers will fill in their card details and click the 'Place Order' tab.
2. Using the checkout_place_orderevent in Woocommere,we delay the form submission and send AJAX requests with card data to our payment processor.
3. Submit the form in JavaScript after validating customer details.
4. In order to process the payment, we use the PHP framework via the payment processor's API.
4.1 Enqueue Scripts
While you check the code in step 2, we added the wp_enqueue_scripts action hook and connected the payment_scripts ( ) method to it.
		/*
		 * Custom CSS and JS, in most cases required only when you decided to go with a custom credit card form
		 */
	 	public function payment_scripts() {

	// we need JavaScript to process a token only on cart/checkout pages, right?
	if ( ! is_cart() && ! is_checkout() && ! isset( $_GET['pay_for_order'] ) ) {
		return;
	}

	// if our payment gateway is disabled, we do not have to enqueue JS too
	if ( 'no' === $this->enabled ) {
		return;
	}

	// no reason to enqueue JavaScript if API keys are not set
	if ( empty( $this->private_key ) || empty( $this->publishable_key ) ) {
		return;
	}

	// do not work with card detailes without SSL unless your website is in a test mode
	if ( ! $this->testmode && ! is_ssl() ) {
		return;
	}

	// let's suppose it is our payment processor JavaScript that allows to obtain a token
	wp_enqueue_script( 'custompayment_js', 'https://www.custompayments.com/api/token.js' );

	// and this is our custom JS in your plugin directory that works with token.js
	wp_register_script( 'woocommerce_tutorialswebsite_payment', plugins_url( 'custompayment.js', __FILE__ ), array( 'jquery', 'custompayment_js' ) );

	// in most payment processors you have to use PUBLIC KEY to obtain a token
	wp_localize_script( 'woocommerce_tutorialswebsite_payment', 'custompayment_params', array(
		'publishableKey' => $this->publishable_key
	) );

	wp_enqueue_script( 'woocommerce_tutorialswebsite_payment' );

}
4.2 Receive a Token in JavaScript
This code is quite different from the rest. However, the idea behind this code is the same. You can check the content for your custompayment.jsfile:
var successCallback = function(data) {

	var checkout_form = $( 'form.woocommerce-checkout' );

	// add a token to our hidden input field
	// console.log(data) to find the token
	checkout_form.find('#custompayment_token').val(data.token);

	// deactivate the tokenRequest function event
	checkout_form.off( 'checkout_place_order', tokenRequest );

	// submit the form now
	checkout_form.submit();

};

var errorCallback = function(data) {
    console.log(data);
};

var tokenRequest = function() {

	// here will be a payment gateway function that process all the card data from your form,
	// maybe it will need your Publishable API key which is custompayment_js.publishableKey
	// and fires successCallback() on success and errorCallback on failure
	return false;

};

jQuery(function($){

	var checkout_form = $( 'form.woocommerce-checkout' );
	checkout_form.on( 'checkout_place_order', tokenRequest );

});
4.3 Payment Form with card information
Creating a payment form with card fields with payment_fields ( ) class method:
You can check the code below:
	public function payment_fields() {

	// ok, let's display some description before the payment form
	if ( $this->description ) {
		// you can instructions for test mode, I mean test card numbers etc.
		if ( $this->testmode ) {
			$this->description .= ' TEST MODE ENABLED. In test mode, you can use the card numbers listed in documentation.';
			$this->description  = trim( $this->description );
		}
		// display the description with  tags etc.
		echo wpautop( wp_kses_post( $this->description ) );
	}

	// I will echo() the form, but you can close PHP tags and print it directly in HTML
	echo '
';
}
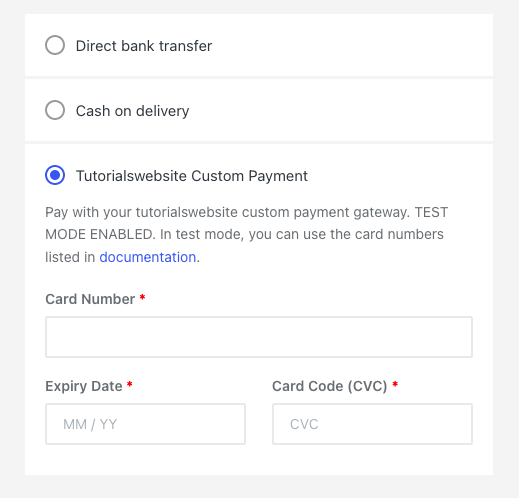
Output Screenshot of checkout payment form:
5. Payment Processing
5.1 Verify Checkout Fields
Validation of checkout fields, such as the first name, is a must.
	public function validate_fields(){

if( empty( $_POST[ 'billing_first_name' ]) ) {
		wc_add_notice(  'First name is required!', 'error' );
		return false;
	}

if( empty( $_POST[ 'billing_last_name' ]) ) {
		wc_add_notice(  'Last name is required!', 'error' );
		return false;
	}

if( empty( $_POST[ 'billing_email' ]) ) {
		wc_add_notice(  'Email is required!', 'error' );
		return false;
	}
	return true;

}
5.2 Set the Order Status to Recieve Payments
After you get the order object with wc_get_order ( ) function, you can implement methods like get_billing_address_1 ( ), get_billing_name ( ), etc. It will help you fetch all the customer details.
Additionally, you can add notes on Edit Order pages with the $order->add_order_note ( ) method. These notes can appear on edit order pages or member areas.
What can beat if you can potentially use direct payments without going to gateway websites? Great, right? It is what we consider.
Use $order->get_total ( ) to receive the order amount.
So, what aids you in getting shop currency? It is get_woocommerce_currency ( )
However, you need to use $order->get_items ( ) if the products list is displayed as asked by your payment gateway.
public function process_payment( $order_id ) {

	global $woocommerce;

	// we need it to get any order detailes
	$order = wc_get_order( $order_id );


	/*
 	 * Array with parameters for API interaction
	 */
	$args = array(

	);

	/*
	 * Your API interaction could be built with wp_remote_post()
 	 */
	 $response = wp_remote_post( '{payment processor endpoint}', $args );


	 if( !is_wp_error( $response ) ) {

		 $body = json_decode( $response['body'], true );

		 // it could be different depending on your payment processor
		 if ( $body['response']['responseCode'] == 'APPROVED' ) {

			// we received the payment
			$order->payment_complete();
			$order->reduce_order_stock();

			// some notes to customer (replace true with false to make it private)
			$order->add_order_note( 'Hey, your order payment is received! Thank you for your order!', true );

			// Empty cart
			$woocommerce->cart->empty_cart();

			// Redirect to the thank you page
			return array(
				'result' => 'success',
				'redirect' => $this->get_return_url( $order )
			);

		 } else {
			wc_add_notice(  'Please try again.', 'error' );
			return;
		}

	} else {
		wc_add_notice(  'Connection error.', 'error' );
		return;
	}

}
5.3 Payment Gateway Callback for Instant Payment Notifications or Webhooks)
Let's assume that our custom payment gateway does not have a form for collecting card information and that the customer will be redirected to a payment gateway website after providing his billing information (such as name, address, etc.).
How can we confirm that payment has been made and reflect it in our store?
When a customer completes an order on a payment gateway website, the gateway makes a request with $_GET parameters to a certain URL of our website that we set on the gateway's settings page. This is how many payment gateways operate. And handling these requests is simple using WooCommerce.
The webhook URLs (callback URLs) in Woo look like this:
And webhook() is the class method that has complete control over the received $_GET parameters.
public function webhook() {
$order = wc_get_order( $_GET['id'] );
	$order->payment_complete();
	$order->reduce_order_stock();

	update_option('webhook_debug', $_GET);


	 	}
So, this is how you create your custom payment gateway for Woocommerce websites.
Bonus:
1. How to activate/deactivate specific payment gateways depending on a country selected on the checkout page
Let's suppose I want to deactivate Paypal for India. So just copy and paste below code:
add_filter( 'woocommerce_available_payment_gateways', 'twc_gateway_for_country' );

function twc_gateway_for_country( $gateways ) {
	global $woocommerce;
	if ( isset( $gateways['paypal'] )
	&& $woocommerce->customer->get_country() == 'IN' ) {
		unset( $gateways['paypal'] ); // deactivate PayPal for India
	}
	return $gateways;
}
2. How to Get All the Installed Payment Methods
class WC_tutorials_website_Gateway extends WC_Payment_Gateway {

 	/**
	* Constructor for the gateway.
	*/
 		public function __construct() {

	        $available_gateways = WC()->payment_gateways->payment_gateways();
		var_dump($available_gateways);

 		}
}
3. How to Get Only Available Gateways
class WC_tutorials_website_Gateway extends WC_Payment_Gateway {

 	/**
	* Constructor for the gateway.
	*/
 		public function __construct() {

	       $available_payment_methods = WC()->payment_gateways()->get_available_payment_gateways();
		var_dump($available_payment_methods);

 		}
}
4. How to Get Selected Payment Method
$selected_payment_method_id = WC()->session->get( 'chosen_payment_method' );
 var_dump($selected_payment_method_id);

//get the selected payment gateway title or other custom data

$selected_payment_method = WC()->payment_gateways()->payment_gateways()[ $selected_payment_method_id ];
print_r( $selected_payment_method );
Are you want to get implementation help, or modify or extend the functionality?
A payment gateway is one of the most crucial elements of an e-commerce website. One of its primary roles is to securely route the card payment data onto the card schemes for authorization by the purchaser.
If you want to simplify the payment process for your e-commerce business, this is how you can create a payment gateway plugin for Woocommerce effortlessly. Remember, your business success depends upon the efficiency of your payment gateway plugin.
Good luck!
FAQs
Is it possible to create a custom payment gateway plugin for WooCommerce?
Yes, it is possible to create a WooCommerce custom payment gateway plugin.
Who can help to develop custom a WooCommerce payment gateway plugin?
A lot's freelancers or companies can help to do it for you. You can also hire Tutorialswebsite developer team to create any WordPress or WooCommerce custom plugin.
Who is the best freelancer developer for payment gateway plugin development?
Vanshaj Sikri is a content creator and marketer who simplifies complex ideas and structures words to make them easy to understand for all audiences. He is a professional writer and editor- currently running her content writing company, Aim2write, in Gurugram, India.
[…] How to Create a Custom Payment Gateway Plugin for Woocommerce? […]
Comments are closed.
This website uses cookies to improve your experience. We'll assume you're ok with this, but you can opt-out if you wish. Cookie settingsACCEPT
Privacy & Cookies Policy
Privacy Overview
This website uses cookies to improve your experience while you navigate through the website. Out of these cookies, the cookies that are categorized as necessary are stored on your browser as they are essential for the working of basic functionalities of the website. We also use third-party cookies that help us analyze and understand how you use this website. These cookies will be stored in your browser only with your consent. You also have the option to opt-out of these cookies. But opting out of some of these cookies may have an effect on your browsing experience.
Necessary cookies are absolutely essential for the website to function properly. This category only includes cookies that ensures basic functionalities and security features of the website. These cookies do not store any personal information.
Any cookies that may not be particularly necessary for the website to function and is used specifically to collect user personal data via analytics, ads, other embedded contents are termed as non-necessary cookies. It is mandatory to procure user consent prior to running these cookies on your website.


[…] How to Create a Custom Payment Gateway Plugin for Woocommerce? […]