

Project Details
We will create CMS For Blog Website using MongoDB, ExpressJS, Angular, and NodeJS. We will use Express and NodeJS for Web API and MongoDB for the database. We will use Admin Panel and frontend on both side features.
Coding Technologies
Backend API: Express, Nodejs
Database: MongoDB
Frontend: Angular
User Feature
- Register
- Login / Logout
- Add Article
- View Article
Admin Feature
- Admin Panel for Article CRUD Operation (Add / Edit /Delete)
- Article Category (Add /Edit /Delete)
- Option to make Article Featured
- User Management
- Article Approval
Fronted Features
- Article Listing Page
- Article Details Page
- Display Article as Featured, Latest Article, Category Wise
- Static Pages: About Us, Contact US, Contact Form
Installing & Integrate Bootstrap in project
npm install bootstrap
Create Project Modules & Component
Let’s create project Module:
ng g module articles
ng g module admin
ng g module middleware
ng g module staticpages
Let’s create Articles Modules:
ng g component articles/article-list
ng g component articles/article-details
ng g component articles/latest-articles
ng g component articles/featured-articles
ng g component articles/categories
Let’s create service for article module:
ng g service articles/articles
Let’s create Components :
ng g component header
ng g component footer
ng g component banner
ng g component pagenotfound
Let’s create components of staticpages module:
ng g component staticpages/about-us
ng g component staticpages/contact-us
Let’s create service for staticpages module
ng g service staticpages/staticpages
Step-1: Open app.module.ts
open your app.module.ts to import articles and static pages module and paste the below code
...
import { ArticlesModule } from './articles/articles.module';
  import { StaticpagesModule } from './staticpages/staticpages.module';

  imports: [
    ....
    ArticlesModule,
    StaticpagesModule
  ],
Step-2: Open articles/articles.module.ts
open your articles/articles.module.ts to export the LatestArticleComponent component for showing this component on the root component app.component.html
...
import { LatestArticlesComponent } from './latest-articles/latest-articles.component';

  imports: [
    CommonModule
  ],
exports:[LatestArticlesComponent]
Step-3: app.component.html
Create Home page layout structure
Theme Integration
styles.css
/* You can add global styles to this file, and also import other style files */
h1 {font-size: 2.4rem;margin-bottom: 30px;}
.bg-blue {background-color:#79ce1d;}
.navbar-brand img { height:30px; }
.navbar-dark .navbar-nav .nav-link {color:#fff;}
.navbar-dark .navbar-nav .active .nav-link {color:#fff;}
.banner img {width:100%;}
.title-heading{clear: both; width: 100%;padding: 10px;text-align: center;margin-bottom: 20px;}
.blog-box {text-align: center; margin-bottom: 20px;padding: 10px;
    border: 1px solid #f7f7f7;
    box-shadow: 0px 2px 2px 1px #f6f6f6;
}
.blog-box h3 { margin:20px 0; font-size:22px; color:#000;}
.blog-box p { color:#666; }
.blog-box span, .posted-on span { font-style: italic; color:#000; }
.blog-box img { width:100%; }
.mtb-40 { margin:40px 0; min-height:450px;}
.banner-box {position: relative;}
.intro-text { width:100%; position: absolute; top:30%; text-align: center; color:#fff;}
.intro-text-box { width: 62%;margin: auto;background-color: rgba(96, 96, 96, 0.6);padding: 20px;border: 10px solid #808080;}
.intro-text-box h1 {font-size:3em;}

.blog-right h3 {background-color:#000;color: #fff; padding:5px 15px;font-size:20px;}
.detail-img {margin:40px 0px;}
.rb-box-img { margin-right:15px; }
.rb-box-img img { width:100px;}
.rb-box {display: flex;}
.rb-box-desc h4 {font-size:20px;color:#000;font-weight: 600;}
.rb-box-desc p {color:#666;}
.rb-box {margin-bottom:10px;}
.recent-post a:hover {text-decoration: none;}
.recent-post a:hover h4 {color:#007EDB;}

.categories {margin-top:20px;}
.categories ul {padding:0;margin:0; list-style: none;}
.categories ul li { border-bottom:1px dotted #ccc; padding:5px 0px; }
.categories ul li a {color:#333; display: block;}
.categories ul li a:hover {color:#007EDB; text-decoration: none;}
.body-content { min-height:380px; }
.error-404 { text-align: center; }
.error-404 h1{ font-size:10em; }
.service-error {text-align:center; padding:50px 0;}
.service-error h1 { font-size: 3em;text-transform: uppercase;color:#007EDA;}

/* For Admin*/

.login-box {box-shadow: 1px 1px 7px #666;padding:20px;margin-top:10%;}
.login-box h1 {font-size:24px;text-align: center;margin-bottom: 20px}
.dash-left ul {padding:0;margin:0;list-style:none;}
.dash-left ul li { background-color: #f1f1f1; margin-bottom:5px;}
.dash-left ul li a {color:#333; padding:5px 15px; display: block;}
.dash-left ul li:hover a {background-color:#007EDB; text-decoration: none; color:#fff;}
.dash-left ul li a.active {background-color:#007EDB; color:#fff;}
.dash-header {display:flex; justify-content: space-between;}
.table img { width:80px; }

footer {background-color: #000;color:#fff; padding:20px;}

/* For validation*/

.ng-valid[required], .ng-valid.required {border: 1px solid #42A948;}
.error {color:#ff0000;}
.success { color:green; }
.contact-message { text-align: center; }

@media (max-width: 767px) {
.intro-text {display: none;}
}
header.component.html
header.component.ts
navbarCollapsed = true;

  toggleNavbarCollapsing() {
      this.navbarCollapsed = !this.navbarCollapsed;
  }
banner.component.html


latest-articles.component.html
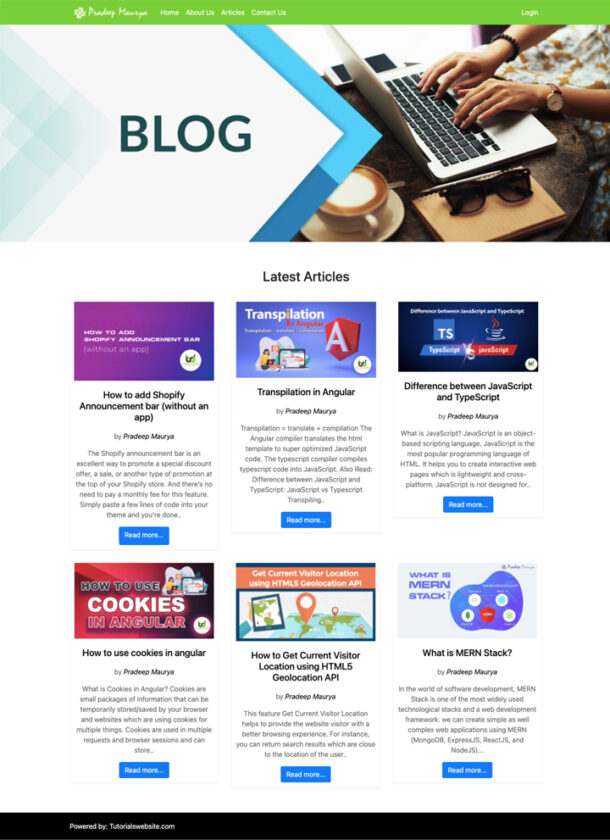
Latest Articles
How to add Shopify Announcement bar (without an app)
by Pradeep Maurya
The Shopify announcement bar is an excellent way to promote a special discount offer, a sale, or another type of promotion at the top of your Shopify store. And there’s no need to pay a monthly fee for this feature. Simply paste a few lines of code into your theme and you’re done..
Read more...Transpilation in Angular
by Pradeep Maurya
Transpilation = translate + compilation The Angular compiler translates the html template to super optimized JavaScript code. The typescript compiler compiles typescript code into JavaScript. Also Read: Difference between JavaScript and TypeScript: JavaScript vs Typescript Transpiling..
Read more...Difference between JavaScript and TypeScript
by Pradeep Maurya
What is JavaScript? JavaScript is an object-based scripting language. JavaScript is the most popular programming language of HTML. It helps you to create interactive web pages which is lightweight and cross-platform. JavaScript is not designed for..
Read more...How to use cookies in angular
by Pradeep Maurya
What is Cookies in Angular? Cookies are small packages of information that can be temporarily stored/saved by your browser and websites which are using cookies for multiple things. Cookies are used in multiple requests and browser sessions and can store..
Read more...How to Get Current Visitor Location using HTML5 Geolocation API
by Pradeep Maurya
This feature Get Current Visitor Location helps to provide the website visitor with a better browsing experience. For instance, you can return search results which are close to the location of the user..
Read more...What is MERN Stack?
by Pradeep Maurya
In the world of software development, MERN Stack is one of the most widely used technological stacks and a web development framework. we can create simple as well complex web applications using MERN (MongoDB, ExpressJS, ReactJS, and NodeJS)...
Read more...


footer.component.html
Home Page Layout

Routing Configuration
App Routing Module Configuration
Edit the file src/app/app-routing.module.ts
import { NgModule } from '@angular/core';
import { Routes, RouterModule } from '@angular/router';
import {PagenotfoundComponent} from './pagenotfound/pagenotfound.component'

const routes: Routes = [
{path:'',redirectTo:'',pathMatch:'full'},
{path:'**',component:PagenotfoundComponent}

];

@NgModule({
  imports: [RouterModule.forRoot(routes)],
  exports: [RouterModule]
})
export class AppRoutingModule { }
}
articles-routing.module.ts Configuration
create the file articles-routing.module.ts in folder src/app/articles/
Edit the file src/app/courses/articles-routing.module.ts
import { NgModule } from '@angular/core';
import { Routes, RouterModule } from '@angular/router';
import {ArticleListComponent} from './article-list/article-list.component';
import {ArticleDetailsComponent} from './article-details/article-details.component';

const routes: Routes = [
{path:'article',component:ArticleListComponent},
{path:'article/:id',component:ArticleDetailsComponent}

];


@NgModule({
  imports: [RouterModule.forRoot(routes)],
  exports: [RouterModule]
})
export class ArticlesRoutingModule { }
staticpages-routing.module.ts Configuration
create the file staticpages-routing.module.ts in folder src/app/staticpages/
Edit the file src/app/staticpages/staticpages-routing.module.ts
import { NgModule } from '@angular/core';
import { Routes, RouterModule } from '@angular/router';
import {AboutUsComponent} from './about-us/about-us.component';
import {ContactUsComponent} from './contact-us/contact-us.component';

const routes: Routes = [
  {path:'about-us', component:AboutUsComponent},
  {path:'contact-us',component:ContactUsComponent}
];

@NgModule({
  imports: [RouterModule.forChild(routes)],
  exports: [RouterModule]
})
export class StaticpagesRoutingModule { }
Home Page Banner & Feature Article Routing
To set banner and featured view on the home page only. you just need to edit the below file
Edit the file src/app/app.component.ts
import { Component } from '@angular/core';
import { Router } from '@angular/router';

@Component({
  selector: 'app-root',
  templateUrl: './app.component.html',
  styleUrls: ['./app.component.css']
})
export class AppComponent {
  constructor(public router:Router){}
  title = 'mean-project';
}
Edit the file src/app/app.component.html
Header Navigation
Set the routerLink and routerLinkActive in header component in menu link
src/app/header/header.component.html
Article Listing and Inner Page Design
Article listing page Design
Edit the file src/app/articles/article-list/article-list.component.html
Article List
How to add Shopify Announcement bar (without an app)
by Pradeep Maurya
The Shopify announcement bar is an excellent way to promote a special discount offer, a sale, or another type of promotion...
Read more...Transpilation in Angular
by Pradeep Maurya
Transpilation = translate + compilation The Angular compiler translates the html template to super optimized JavaScript code...
Read more...Difference between JavaScript and TypeScript
by Pradeep Maurya
What is JavaScript? JavaScript is an object-based scripting language. JavaScript is the most popular programming language of HTML...
Read more...How to use cookies in angular
by Pradeep Maurya
What is Cookies in Angular? Cookies are small packages of information that can be temporarily stored/saved by your browser ...
Read more...How to Get Current Visitor Location using HTML5 Geolocation API
by Pradeep Maurya
This feature Get Current Visitor Location helps to provide the website visitor with a better browsing experience...
Read more...What is MERN Stack?
by Pradeep Maurya
In the world of software development, MERN Stack is one of the most widely used technological stacks and a web development framework...
Read more...
Featured Article Right Widget Design
Edit the file src/app/articles/featured-articles/featured-articles.component.html
    Featured Posts


                How to add Shopify Announcement bar (without an app)
                by Pradeep Maurya
                Posted On: March 10, 2019


                Transpilation in Angular
                by Pradeep Maurya
                Posted On: March 10, 2019


                Difference between JavaScript and TypeScript
                by Pradeep Maurya
                Posted On: March 10, 2019


                How to use cookies in angular
by Pradeep Maurya
                Posted On: March 10, 2019


                How to Get Current Visitor Location using HTML5 Geolocation API
by Pradeep Maurya
                Posted On: March 10, 2019
Article Categories List Widget Design
Edit the file src/app/articles/categories/categories.component.html
Add css for article lists and right widget
Edit the file src/styles.css and insert below css code
.blog-list .blog-box{
    text-align: left;
}
.blog-list .blog-box h3 {
    margin: 5px 0;
    font-size: 22px;
    color: #000;
}
.blog-list .blog-box p{
    margin-bottom: 5px;
}
.blog-list .blog-box .readmore{
    color:blue;
}
.widget{text-align: left; margin-bottom: 20px;padding: 15px;
    border: 1px solid #f7f7f7;
    box-shadow: 0px 2px 2px 1px #f6f6f6;}
    .widget p{margin-bottom: 5px;}
    .widget a{text-decoration: none;}
    .widget .rb-box{
        border-bottom: 1px solid #f6f6f6;
    }
 .widget-title{
     text-align: left;
     width: 100%;
     margin: 15px auto;
     display: inline-block;
 }
 .detail-img img{width:100%;}
Article Details Page Design
Edit the file src/app/articles/article-details/article-details.component.html
How to add Shopify Announcement bar (without an app)
by Pradeep Maurya on March 10, 2019
The Shopify announcement bar is an excellent way to promote a special discount offer, a sale, or another type of promotion at the top of your Shopify store. And there’s no need to pay a monthly fee for this feature. Simply paste a few lines of code into your theme and you’re done.
This free Shopify announcement bar also allows you to display an optional “free shipping countdown,” so customers can always see how close they are to receiving free shipping.
Now these days eCommerce websites have many announcement. So they need to notify user about announcements. Like: –
- Highlight a recently released product
- Advertise a special or promotion
- Weather delay or holiday hours
- Promote upcoming new products
- Offer a free giveaway or download
- Share news about a recent award or certification
About Us Page Design
Edit the file src/app/staticpages/about-us/about-us.component.html
About Us
The Shopify announcement bar is an excellent way to promote a special discount offer, a sale, or another type of promotion at the top of your Shopify store. And there’s no need to pay a monthly fee for this feature. Simply paste a few lines of code into your theme and you’re done.
This free Shopify announcement bar also allows you to display an optional “free shipping countdown,” so customers can always see how close they are to receiving free shipping.
Now these days eCommerce websites have many announcement. So they need to notify user about announcements. Like: –
- Highlight a recently released product
- Advertise a special or promotion
- Weather delay or holiday hours
- Promote upcoming new products
- Offer a free giveaway or download
- Share news about a recent award or certification
Contact Us Page Design
Edit the file src/app/staticpages/contact-us/contact-us.component.html
Contact Us
Do you have any questions? Please do not hesitate to contact us directly. Our team will come back to you within a matter of hours to help you.
Delhi , India-110009
+91-99999999
info@tutorialswebsite.com
Create Express App for Backend API

MongoDB Atlas Connection & User Models Schema
Install Mongoose Package to connect MongoDB with Nodejs/Express
npm install mongoose

Now we will create a models folder under the backend/api folder.
Next, we will create a user.js file to define MongoDB Atlas Connection and User Model Schema.
Edit the file backend/api/models/user.js
const mongoose = require('mongoose');
mongoose.connect('mongodb+srv://meanproject:@clustermean.puxhx.mongodb.net/meanDatabase?retryWrites=true&w=majority', {useNewUrlParser: true});
var conn =mongoose.Collection;

var userSchema =new mongoose.Schema({
  name: String,
  email: String,
  password: String,

});

var userModel = mongoose.model('Users', userSchema);
module.exports=userModel;
Please changes the database string with your MongoDB connection string.
Save User Records to MongoDB Cluster
Edit the file backend/api/routes/users.js
var express = require('express');
var userModel = require('../models/user');
var router = express.Router();

/* GET users listing. */
router.get('/', function(req, res, next) {

  var userDetails = new userModel({
    name: 'Vikas',
    email: 'vikas@gmail.com',
    password: 'vikas@123',

  });

  userDetails.save(function(err,req1){
    if(err) throw err;

    res.render('index', { title: 'User Data Inserted' });

  })


});

module.exports = router;
Now open the URL: http://localhost:3000/users to insert user records
Create User Account Modules & Component
Create Account Module
ng g module account --routing
Create Registration Component under account folder
ng g c account/registration
Create Login Component under account folder
ng g c account/login
Create service for account module
ng g service account/accountservice
Create the design of registration page
Edit src/app/account/registration/registration.component.html
User Registration
{{massage}}
Create a class as accountinfo
ng g class account/accountinfo
Add/Edit the properties in the file src/app/account/accountinfo.ts
export class Accountinfo {

     Name:string;
     Email:string;
     Password:string;
}
Edit the properties in the file src/app/account/accountservice.service.ts
import { Injectable } from '@angular/core';
import { HttpClient,HttpHeaders} from '@angular/common/http';
import {Observable} from 'rxjs';
import {Accountinfo} from './accountinfo'

@Injectable({
  providedIn: 'root'
})
export class AccountserviceService {
  url='http://localhost:3000/'
  constructor(private http:HttpClient) { }
  createaccount(accinfo:Accountinfo):Observable{

    return this.http.post(this.url+'api/register',accinfo)
  }
}
Edit the properties in the file src/app/account/registration/registration.component.ts
Import the FormBuilder, Validators, FormGroup from @angular/forms
Import the AccountserviceService service and Accountinfo Class
Inject FormBuilder and AccountserviceService in constructor
Set the Validators for all controls
Create the method for createuserAccount
import { Component, OnInit } from '@angular/core';
import { FormBuilder, Validators, FormGroup } from '@angular/forms';
import {AccountserviceService} from '../accountservice.service';
import {Accountinfo} from '../accountinfo';
@Component({
  selector: 'app-registration',
  templateUrl: './registration.component.html',
  styleUrls: ['./registration.component.css']
})
export class RegistrationComponent implements OnInit {
  regForm: FormGroup;
  datasaved = false;
  massage: string;
  constructor(private formbuilder: FormBuilder, private accountservice: AccountserviceService) { }

  ngOnInit() {
    this.setFormState();
  }
  setFormState(): void {
    this.regForm = this.formbuilder.group({
       Name: ['', [Validators.required]],
      Email: ['', [Validators.required]],
      Password: ['', [Validators.required]]
    })
  }

  onSubmit() {

    let userinfo = this.regForm.value;
//console.log(userinfo);
    this.createuserAccount(userinfo);
    this.regForm.reset();
  }
  createuserAccount(accinfo:Accountinfo) {
    this.accountservice.createaccount(accinfo).subscribe(
      () => {
        this.datasaved = true;
        this.massage = "User Created";
       this.regForm.reset();
      }
    )
  }
}
Edit the file src/app/app.module.ts
Import AccountserviceService and set it in provider array
Import HttpClientModule and set it in imports array
Import AccountModule and set it in provider array
import { HttpClientModule, HttpClient } from ‘@angular/common/http’; and set it in imports array
import { BrowserModule } from '@angular/platform-browser';
import { NgModule } from '@angular/core';
import {AccountserviceService} from './account/accountservice.service';
import { HttpClientModule, HttpClient } from '@angular/common/http';
import { AppRoutingModule } from './app-routing.module';
import { AppComponent } from './app.component';
import { HeaderComponent } from './header/header.component';
import { FooterComponent } from './footer/footer.component';
import { BannerComponent } from './banner/banner.component';
import { PagenotfoundComponent } from './pagenotfound/pagenotfound.component';
import { ArticlesModule } from './articles/articles.module';
import { StaticpagesModule } from './staticpages/staticpages.module';
import {AccountModule} from './account/account.module';

@NgModule({
  declarations: [
    AppComponent,
    HeaderComponent,
    FooterComponent,
    BannerComponent,
    PagenotfoundComponent
  ],
  imports: [
    BrowserModule,
    HttpClientModule,
    ArticlesModule,
    StaticpagesModule,
    AccountModule,
    AppRoutingModule,

  ],
  providers: [AccountserviceService],
  bootstrap: [AppComponent]
})
export class AppModule { }
Edit the file src/app/account/account.module.ts
import { FormsModule, ReactiveFormsModule } from ‘@angular/forms’;
Set ReactiveFormsModule it in imports array and FormsModule, ReactiveFormsModule in exports array
import { NgModule } from '@angular/core';
import { CommonModule } from '@angular/common';
import { FormsModule, ReactiveFormsModule } from '@angular/forms';
import { AccountRoutingModule } from './account-routing.module';
import { RegistrationComponent } from './registration/registration.component';
import { LoginComponent } from './login/login.component';


@NgModule({
  declarations: [RegistrationComponent, LoginComponent],
  imports: [
    CommonModule,
    AccountRoutingModule,
    ReactiveFormsModule
  ],
  exports: [
    CommonModule,
    FormsModule,
    ReactiveFormsModule
  ]
})
export class AccountModule { }
Edit the file src/app/account/account-routing.module.ts
Create route path for register page and define the component which we want to load.
import {RegistrationComponent} from './registration/registration.component'

const routes: Routes = [
  {path:'register',component:RegistrationComponent},

];
Create API in Backend to submit register form data using post method
Edit the file backend/api/app.js
define app.use(‘/api’, usersRouter); in app.js
Edit the file backend/api/routes/users.js
Now we will create new route “register” using post method.
router.post('/register', function(req, res, next) {

  var userDetails = new userModel({
    name: req.body.Name,
    email: req.body.Email,
    password: req.body.Password,

  });

  userDetails.save().then(doc=>{
    res.status(201).json({
        message:"Inserted Successfully",
        results:doc
    });
})
.catch(err=>{
    res.json(err);
});


});
Access to XMLHttpRequest at ‘http://localhost:3000/api/register’ from origin ‘http://localhost:4200’ has been blocked by CORS policy: Response to preflight request doesn’t pass access control check: No ‘Access-Control-Allow-Origin’ header is present on the requested resource.
Edit the file backend/api/app.js
Add the below code to app.js to resolve the CORS policy
app.use(function(req, res, next) {
  res.header("Access-Control-Allow-Origin", "*");
  res.header(
    "Access-Control-Allow-Headers",
    "Origin, X-Requested-With, Content-Type, Accept,Authorization"
  );
  res.header('Access-Control-Allow-Methods', 'GET,PUT,PATCH,POST,DELETE,OPTIONS');
  next();
});
Now test and submit the register page form data, you will get success response and data will insert into mongodb database.
User Model Schema or User table Schema Validation
Edit the file backend/api/models/user.js
var userSchema =new mongoose.Schema({

  name: {type:String,
    required: true
       },
  email:  {
    type:String,
    required: true,
    index: {
        unique: true,
    },
    match:/[a-z0-9!#$%&'*+/=?^_`{|}~-]+(?:\.[a-z0-9!#$%&'*+/=?^_`{|}~-]+)*@(?:[a-z0-9](?:[a-z0-9-]*[a-z0-9])?\.)+[a-z0-9](?:[a-z0-9-]*[a-z0-9])?/

  },
  password:  {
    type:String,
    required: true
},
date:{
  type: Date,
  default: Date.now }
});
How to resolve below warning message on backend
(node:10270) [MONGODB DRIVER] Warning: Current Server Discovery and Monitoring engine is deprecated, and will be removed in a future version. To use the new Server Discover and Monitoring engine, pass option { useUnifiedTopology: true } to the MongoClient constructor.
(node:10270) DeprecationWarning: collection.ensureIndex is deprecated. Use createIndexes instead.
Solution:
You have to add {useCreateIndex: true, useUnifiedTopology: true} in MongoClient constructor. Please check the below code
const mongoose = require('mongoose');
mongoose.connect('mongodb connection string', {useNewUrlParser: true,useCreateIndex: true, useUnifiedTopology: true});
var conn =mongoose.Collection;
Check Email Exists function
If you want to check the current user enter an email that already exists or is not in database before register an new account. We will add the below function in the route file and pass this function with register post route as middleware.
function checkEmail(req,res,next){
  var email=req.body.Email;
  var checkexitemail=userModel.findOne({email:email});
  checkexitemail.exec((err,data)=>{
 if(err) throw err;
 if(data){
  return res.status(200).json({
    msg:"Email Already Exits",
    results:data
});
 }
 next();
  });
}
In the below code you can see, I am using checkEmail as middleware.
router.post('/register',checkEmail,function(req, res, next) {


  var userDetails = new userModel({
    name: req.body.Name,
    email: req.body.Email,
    password: req.body.Password,
  });

  userDetails.save().then(resResult=>{
    res.status(201).json({
        msg:"Inserted Successfully",
        results:resResult
    });
})
.catch(err=>{
    res.json(err);
});


});
Now test and submit the register page form data, you will get success response and data will insert into mongodb database.
How to Enctypt User Password submitted with Registration Form
To encrypt the user registration form password, we will install the package named bcrypt and use this package to create a password hash to store into the database.
Let’s install the package bcrypt. Follow the below steps:
npm install bcrypt
Now we have to import or require this package in our backed route file
Edit the file backend/api/routes/users.js
const bcrypt = require('bcrypt');
Now we have to do some changes to register post route
Copy the below and replace your current code with the below one
router.post('/register', checkEmail,function(req, res, next) {

  bcrypt.hash(req.body.Password, 10, function(err, hash) {

    if(err){
      res.status(400).json({
            msg:"Something Wrong, Try Later!",
            results:err
        });
    }else{
  var userDetails = new userModel({
    name: req.body.Name,
    email: req.body.Email,
    password: hash,

  });

  userDetails.save().then(resResult=>{
    res.status(201).json({
        msg:"Inserted Successfully",
        results:resResult
    });


})
.catch(err=>{
    res.json(err);
});
}
});
});
In the above code, you will find
bcrypt.hash(req.body.Password, 10, function(err, hash) {
In the code, you can see we are using bcrypt hash function to create a password hash and Salt length as 10 to generate or salt to use.
After replacing the code, just refresh your register page and submit the form.
Wow Now the password is showing encrypted format in the database.


User Login
Now we will see the complete step about the login form, login services, login route, show success, and error message.
So let’s start with the login form creation
Create user login form
Edit src/app/account/login/login.component.html
User Login
{{message}}{{message}}
Create a class as userloginfo
ng g class account/userloginfo
Add/Edit the properties in the file src/app/account/userloginfo.ts
export class Userloginfo {
     Email:string;
     Password:string;
}
Edit the properties in the file src/app/account/login/login.component.ts
Import the FormBuilder, Validators, FormGroup from @angular/forms
Import the AccountserviceService service and Userloginfo Class
Inject FormBuilder and AccountserviceService in the constructor
Set the Validators for all controls
Create the method for userlogin
import { Component, OnInit } from '@angular/core';
import { FormBuilder, Validators, FormGroup } from '@angular/forms';
import {AccountserviceService} from '../accountservice.service';
import {Userloginfo} from '../userloginfo';
@Component({
  selector: 'app-login',
  templateUrl: './login.component.html',
  styleUrls: ['./login.component.css']
})
export class LoginComponent implements OnInit {
  loginForm: FormGroup;
  datasaved = false;
  message: string;
  status:string;

  constructor(private formbuilder: FormBuilder, private accountservice: AccountserviceService) { }

  ngOnInit(): void {
    this.setFormState();
  }
  setFormState(): void {
    this.loginForm = this.formbuilder.group({
      Email: ['', [Validators.required]],
      Password: ['', [Validators.required]]
    })
  }

  onSubmit() {

    let userinfo = this.loginForm.value;
    this.userLogin(userinfo);
    this.loginForm.reset();
  }
  userLogin(logininfo:Userloginfo) {
    this.accountservice.userlogin(logininfo).subscribe(
      (resResult) => {
       let resp=JSON.stringify(resResult);
       console.log(resp);
        this.datasaved = true;
        this.message = resResult['msg'];
        this.status = resResult['status'];
        if(resResult['status']=='success'){
        localStorage.setItem('Loginuser',resp)
        }else{
          localStorage.removeItem('Loginuser');
        }
       this.loginForm.reset();
      }
    )
  }

}
Edit the file src/app/account/account-routing.module.ts
Create a route path for the login page and define the component which we want to load.
import {LoginComponent} from './login/login.component';

const routes: Routes = [
  {path:'login',component:LoginComponent},

];
Add the properties in the file src/app/account/accountservice.service.ts
Import the Userloginfo Class and create userlogin service method to pass user login details
import {Userloginfo} from './userloginfo';

userlogin(logininfo:Userloginfo):Observable{

    return this.http.post(this.url+'api/login',logininfo)
  }
Create API in Backend to submit login form data using post method
Edit the file backend/api/routes/users.js
Now we will create a new route “login” using the post method.
router.post("/login",function(req,res,next){

  var email=req.body.Email;
  userModel.find({email:email})
  .exec()
  .then(user=>{
      if(user.length<1){
          res.status(200).json({
            msg:"Auth Failed",
            UserData:'',
            status:'error'
          });
      }else{
          bcrypt.compare(req.body.Password, user[0].password, function(err, result) {
             if(err){
              res.json({
                msg:"Auth Failed",
                UserData:'',
                status:'error'
              });
             }
             if(result){
              res.status(200).json({
                msg:"User Login Successfully",
                  UserData:user,
                  status:'success'
              });
             }else{
              res.json({
                msg:"Auth Failed",
                UserData:'',
                status:'error'
              });
             }
          });

  }
  })
  .catch(err=>{
      res.json({
          error:err
      });
  })


  });
Add Login route to navigation menu
Now open the URL: http://localhost:3000/login and enter your user email and password
Define User Role
Here we will see about user roles like admin, author.
Find below code and update your backend user schema and define the default role with the new user account creation
Edit the file backend/api/models/user.js
var userSchema =new mongoose.Schema({
  name: {type:String,
    required: true
       },
  email: {
    type:String,
    required: true,
    index: {
        unique: true,
    },
    match:/[a-z0-9!#$%&'*+/=?^_`{|}~-]+(?:\.[a-z0-9!#$%&'*+/=?^_`{|}~-]+)*@(?:[a-z0-9](?:[a-z0-9-]*[a-z0-9])?\.)+[a-z0-9](?:[a-z0-9-]*[a-z0-9])?/

  },
  password:  {
    type:String,
    required: true
},
role:  {
  type:String,
  required: true
},
date:{
  type: Date,
  default: Date.now }

});

var userModel = mongoose.model('Users', userSchema);
module.exports=userModel;
As in the above code, we define the new schema property as “role”.
Now we have to assign the predefined role value as “Author” at the time of the user registration.
Edit the file backend/api/routes/users.js
var userDetails = new userModel({
        name: req.body.Name,
        email: req.body.Email,
        password: hash,
        role:'Author'

      });
In the above code, you can see, I defined static predefined value for role as “Autor”.
We will update this userDetails under the registration route. You can find the complete code below.
router.post('/register', checkEmail,function(req, res, next) {


  bcrypt.hash(req.body.Password, 10, function(err, hash) {
    if(err){
      res.status(400).json({
            msg:"Something Wrong, Try Later!",
            results:err
        });
    }else{
      var userDetails = new userModel({
        name: req.body.Name,
        email: req.body.Email,
        password: hash,
        role:'Author'

      });

      userDetails.save().then(resResult=>{
        res.status(201).json({
            msg:"User Created Successfully",
            results:resResult
        });
    })
    .catch(err=>{
        res.json(err);
    });

    }

  });


});
Now you can test the functionality with new user registration.
Logout Function
Now we will work on the logout function after successfully loggedin.
Edit the file: src/app/header/header.component.html
Now we will add below logout code after the login link in the header.component.html file
In the above code, you can see the *ngIf condition to check the user is logged in or not. We will define the isloggedin default value as false in the header.component.ts file.
Edit the file: src/app/header/header.component.ts
First import the Router from “@angular/router”
import { Router } from "@angular/router";
Now we need to define the logout function as well as we need to assign the Router to a private variable using the constructor.
Also, we will define a custom variable isloggedin=false; to check user logged in or not
 isloggedin=false;
  constructor( private router:Router) {

    if(localStorage.getItem('Loginuser')){
      this.isloggedin=true;
    }
  }
In the above code, you can find the if condition to check localStorage have “Login user” data or not. if the condition find true then we will assign isloggedin=true;
After the above code, we will define the logout function to remove the localStorage item when the user will click on the logout button.
When the localStorage item will remove, we will again change the isloggedin as false and navigate the user to the home page
 onLogout() {
    localStorage.removeItem('Loginuser');
    this.isloggedin = false;
    this.router.navigate(['/']);
  }
